If your computer has Node Package Manager (npm) installed, go to the next step. If your computer does not npm installed, this article will show the command to install npm with a package manager so install brew (macOS) or Chocolatey (Windows) by following the steps in this article.
Create AWS Account
First things first, you will need an AWS account to configure Amplify CLI and therefore, create one if you do not already have one. You can signup for AWS from here.

Install npm
We will use different package managers for macOS and Windows. For macOS, we will use brew to install npm and for Windows, we will use Chocolatey. Jump to the appropriate section for instructions.
macOS
If using macOS, open Terminal and execute brew install npm to install. You can open Terminal from Spotlight Search or from Application > Other > Terminal.

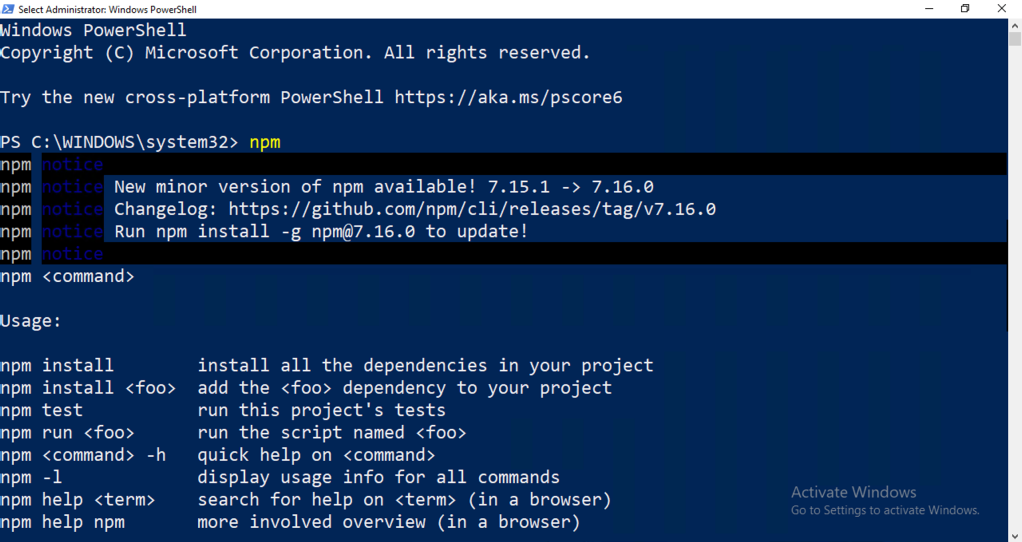
After installation, test npm by executing the command npm. If npm requires an update, it will give you the command to run in the output.

Windows
For Windows, run administrative PowerShell and execute choco install nodejs.

After installation execute npm and it should respond. If npm has a newer version as shown in the screenshot below, copy and paste the command in your shell and update npm to the latest version.
Install AWS Amplify CLI
Start off by running node -v and npm -v to verify if both meet the prerequisites to install Amplify CLI. As of June 7, 2021, it requires Node.js version 10.x or greater and npm version 6.X or greater.

Now that we have node and npm installed and verified the versions, let’s install Amplify CLI. Run npm install -g @aws-amplify/cli.

Wait until the installation process finishes.
Configure AWS Amplify
Finally, let’s configure AWS Amplify by running amplify configure from the console. Note that this will require to log into your AWS account through the browser and the web page will prompt for your email and password. If you have a company account using single sign-on (SSO), make sure to login before executing the command.
Amazon has made this super simple, so just follow the instructions on the prompt.
I have chosen ap-southeast-2 as the region because I live in Sydney. If you want to use the most economical region and do not care about latency, use us-west-2. You can go through the list of available regions and there location in Amazon’s document but below is also a list for convenience.
| Code | Location |
|---|---|
| us-east-1 | US East (N. Virginia) |
| us-east-2 | US East (Ohio) |
| us-west-2 | US West (Oregon) |
| eu-west-1 | Europe (Ireland) |
| eu-west-2 | Europe (London) |
| eu-central-1 | Europe (Frankfurt) |
| ap-northeast-1 | Asia Pacific (Tokyo) |
| ap-northeast-2 | Asia Pacific (Seoul) |
| ap-southeast-1 | Asia Pacific (Singapore) |
| ap-southeast-2 | Asia Pacific (Sydney) |
| ap-south-1 | Asia Pacific (Mumbai) |
| ca-central-1 | Canada (Central) |
