Introduction
Integrating Meraki MR and Azure Active Directory (AD) required a RADIUS server such as Cisco Identity Service Engine (ISE) and Meraki users dislike this deployment because it adds cost and management overhead. During my recent proof of concept, I noticed Azure Active Directory Domain Services (AD DS) supports Lightweight Directory Access Protocol (LDAP) with STARTTLS. That means Meraki MRs can directly query Azure Active Directory (AD) and authenticate clients via 802.1X by utilizing the Local Auth feature. In other words, MRs no longer require a RADIUS server for Azure AD integration. This blog post will explain the steps to achieve this.
Overview

Two features make the solution possible.
- Local Auth on MR
- Azure AD Domain Services supporting LDAP with STARTTLS on port 389
Briefly explaining both features, Local Auth spins a RADIUS server on the MR, so that it can translate RADIUS into LDAP by itself. The wireless client and MR will go through EAP exchange and the MR and Azure AD DS will go through LDAP exchange. Furthermore, Local Auth feature requires LDAP server to support STARTTLS, and Azure AD DS supports it on port 389. Although Microsoft does not outline STARTTLS in their document, Microsoft support has confirmed the behavior as expected because it functions similar to traditional domain services. Azure AD DS does have some limitations compared to traditional domain services such as object synchronization from Azure AD, but Azure AD DS definitely supports STARTTLS.
Caveats
- MR only supports a single LDAP server with Local Auth
- Azure only supports AD DS deployment in a single region
- MR does not support Secure LDAP (LDAPS)
- Azure AD DS does not support port 389 over the internet
This solution relies on Microsoft Azure’s SLA (99.99%) due to the caveats above. In addition, the solution requires a secure connection so that the MR can reach Azure AD DS by its private IP addresses. Although Azure AD DS allows LDAPS over the internet, it only allows port 636 and not 389.

Hopefully, MR’s Local Auth feature allows LDAPS or Azure AD DS opens port 389 over the internet.
Prerequisites
This post does not cover building everything from scratch, and the following prerequisites exist.
- HQ/Branch Meraki network
- Azure AD configured
Requirements
The configure section requires the following devices.
- Device with OpenSSL
- Windows device (optional)
The device that has OpenSSL installed will generate the .PFX and .PEM certificates and the Windows device will run ldp for testing LDAP. If your machine does not have OpenSSL installed, install it with a package manager, Homebrew or Chocolatey.
macOS:
brew install opensslWindows:
choco install opensslConfigure
This section will show the configuration required for a client to authenticate via 802.1X with a user in Azure Active Directory.
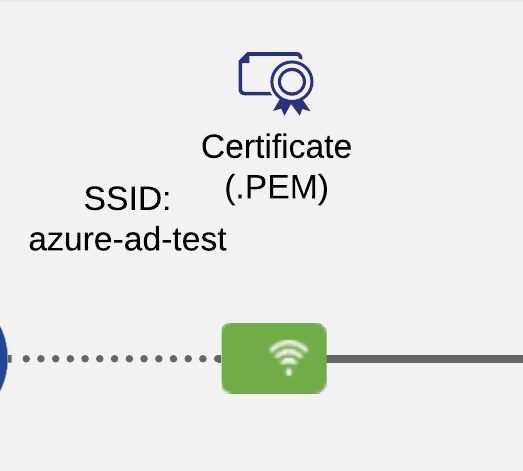
Topology
The below topology diagram shows the components involved.

I have grouped the components into the following five, so anyone can easily replicate the solution.
- Azure AD
- Azure AD DS
- Meraki MX and vMX
- VNet Route Table
- Meraki MR
Azure AD
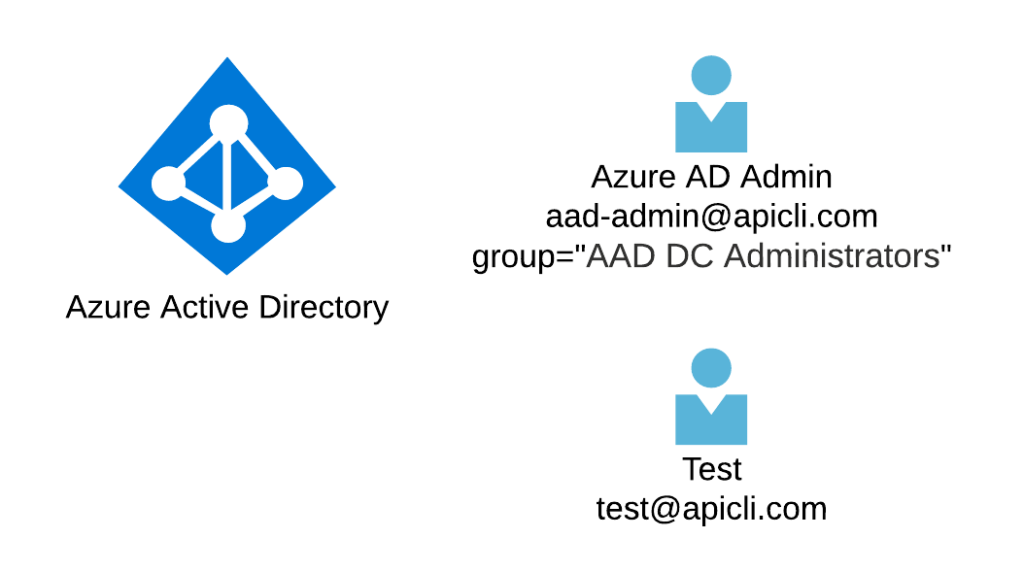
Let us start by creating users in Azure Active Directory. After completing this section, Azure AD will have users, Azure AD Admin ([email protected]) and Test ([email protected]). MR will access Azure with AD Admin, and a wireless device will use Test to authenticate.
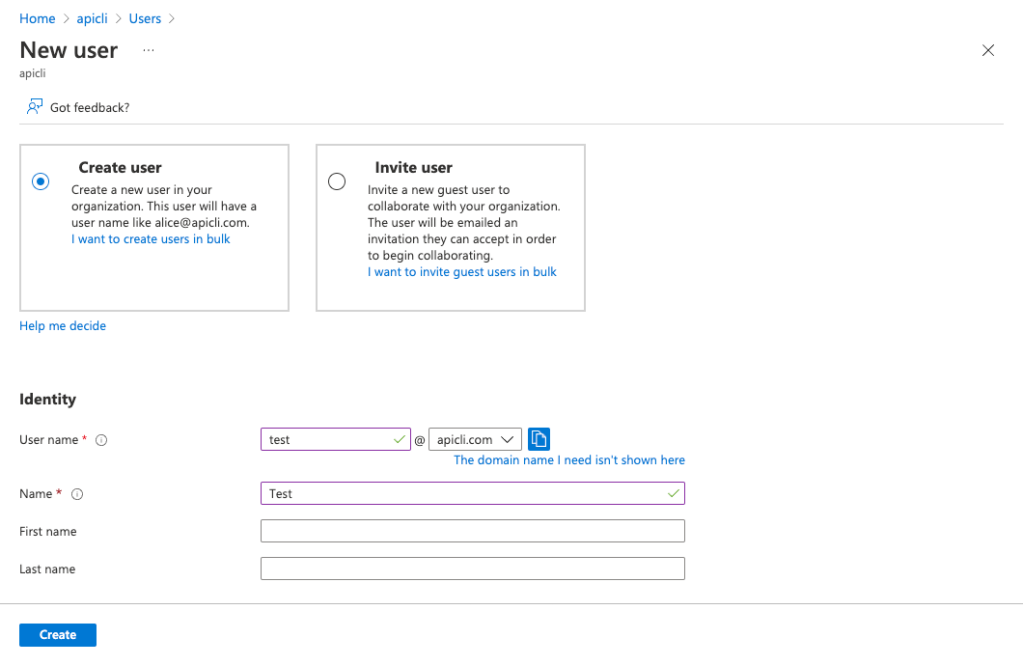
Open Azure AD by typing in Azure Active Directory in the search bar. Then, click on New User and start filling in the user details. The GIF below shows creating [email protected]. Make sure to Show Password and keep a note of it if you plan to use Auto-generate password.

For reference, I have created Azure AD Admin with the following configuration.
- Identity
- User name: [email protected]
- Name: Azure AD Admin
- First name: [Blank]
- Last name: [Blank]
- Password
- Auto-generate password
- Show Password: [Tick]
- Groups and roles
- Groups: AAD DC Administrators
If you forgot to add the group to the user as I did, drill into the user and navigate to Groups in the left pane. Then, click on Add memberships and add AAD DC Administrators.

Follow the same steps for Test. This user should not have access to Azure AD, so the user will not join the group AAD DC Administrators.
- Identity
- User name: [email protected]
- Name: Test
- First name: [Blank]
- Last name: [Blank]
- Password
- Auto-generate password
- Show Password: [Tick]
Both users have access to Azure portal because they need to reconfigure their initial passwords before using the account. Usually, users can change their passwords through a Windows device or an internal portal. I do not have any of these and used Azure portal for this. If you do not require access to Azure portal, please select Yes for Block sign in when creating an account.

Azure AD DS
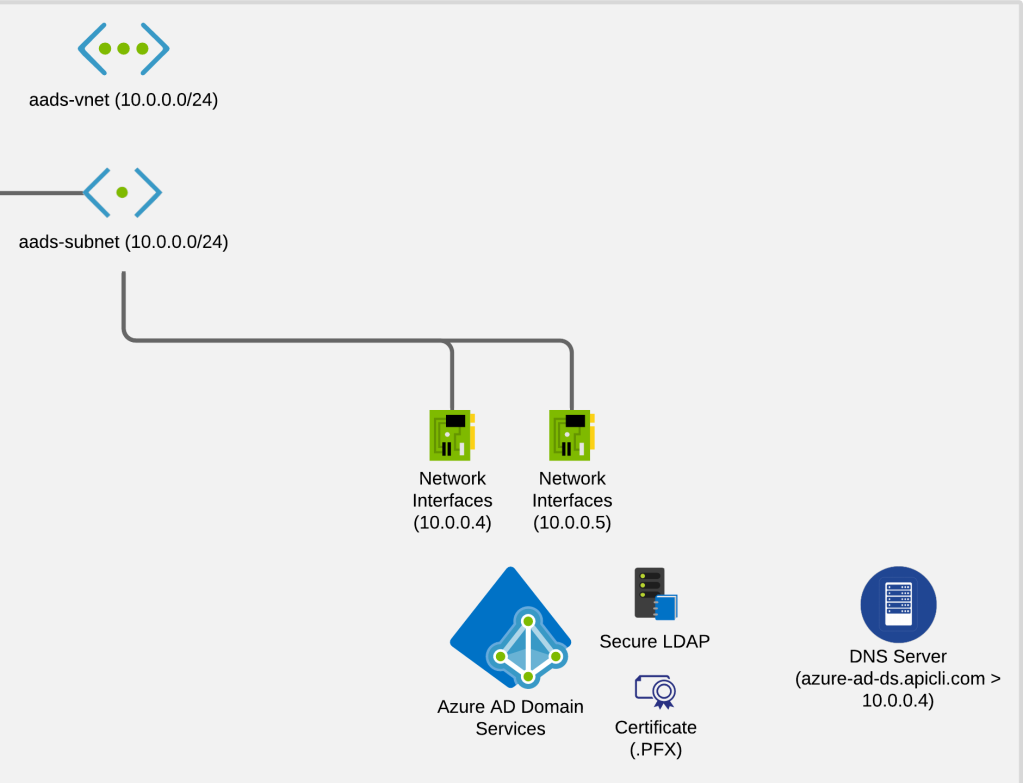
Next, let’s configure Azure AD DS and enable Secure LDAP. The configuration wizard for Azure AD DS will create a virtual network named aadds-vnet with an address range of 10.0.0.0/24, a subnet named aadds-subnet using all of that address range, and two network interfaces with 10.0.0.4 and 10.0.0.5 as the IP addresses. In detail, these will become the IP addresses for the MR for LDAP exchange.
Although the MR will not use Secure LDAP on port 636, Azure AD DS requires Secure LDAP enabled to use LDAP with STARTTLS on port 389. To enable Secure LDAP, Azure AD DS requires a .PFX certificate. The below steps will also cover generating the certificates from scratch.
Azure AD DS
To enable Azure AD DS, search for Azure AD Domain Services. After opening the page, click on the Create button located at the top left and insert the required information for each step.

See below for an example configuration which you can also view in the GIF above. I only changed some values in the Basic tab and used prepopulated values for most parts. Please change if required.
- Basic
- Subscription: MSDN Platforms
- Resource group: Create new named azure-ad-ds
- DNS domain name: apicli.com
- Region: (Asia Pacific) Australia East
- SKU: Standard
- Forest type: User
The provisioning process will take about 30 minutes, so generate the required certificates explained in the next section while waiting.
Certificate
Secure LDAP requires a .PFX certificate, and the MR requires a .PEM certificate for LDAP exchange. OpenSSL can generate these certificates, and we will start by creating a certificate signing request (CSR). From there, we will make the .CRT, .PFX, and .PEM certificates.
First, create a configuration file from the template below with a name of your preference and with the extension .cfg. For example, I have stored this as apicli.cfg. Please replace the text highlighted, but make sure CN has a wildcard prepended, *.apicli.com in this case. Azure AD DS will not accept apicli.com as the subject alternative name because Domain Controllers will use random names.
# openssl x509 extfile params
extensions = extend
[req] # openssl req params
prompt = no
distinguished_name = dn-param
[dn-param] # DN fields
C = AU
ST = NSW
L  = Sydney
O = APICLI
CN = *.apicli.com
[extend] # openssl extensions
subjectKeyIdentifier = hash
authorityKeyIdentifier = keyid:always
keyUsage = digitalSignature,keyEncipherment,keyCertSign
extendedKeyUsage=serverAuth,clientAuth
Second, create a .CRT certificate with the following command. Again, make sure you change the highlighted.
openssl x509 -req -sha256 -days 1095 -in apicli.csr -signkey apicli.key -out apicli.crt -extfile apicli.cfgThird, create a .PFX certificate. During the process, it will prompt a password, so type one.
openssl pkcs12 -export -out apicli.pfx -inkey apicli.key -in apicli.crt
Enter Export Password:
Verifying - Enter Export Password:
Lastly, create a .PEM certificate with the following command.
openssl x509 -in apicli.crt -out apicli.pem -outform PEMSecure LDAP
Since you have created all necessary certificates, open the created Azure AD DS and select Secure LDAP in the menu on the left pane.

Click on Enable, upload the .PFX certificate, enter the password configured when generating it, and hit Save.
DNS
Add an A record that resolves to the IP addresses of Azure AD DS, 10.0.0.4 and 10.0.0.5. I have added A records with the name azure-adds.apicli.com and the addresses 10.0.0.4 and 10.0.0.5.

Check with tools such as nslookup if properly configured.

This ends configuring Azure AD DS.
Meraki MX and vMX
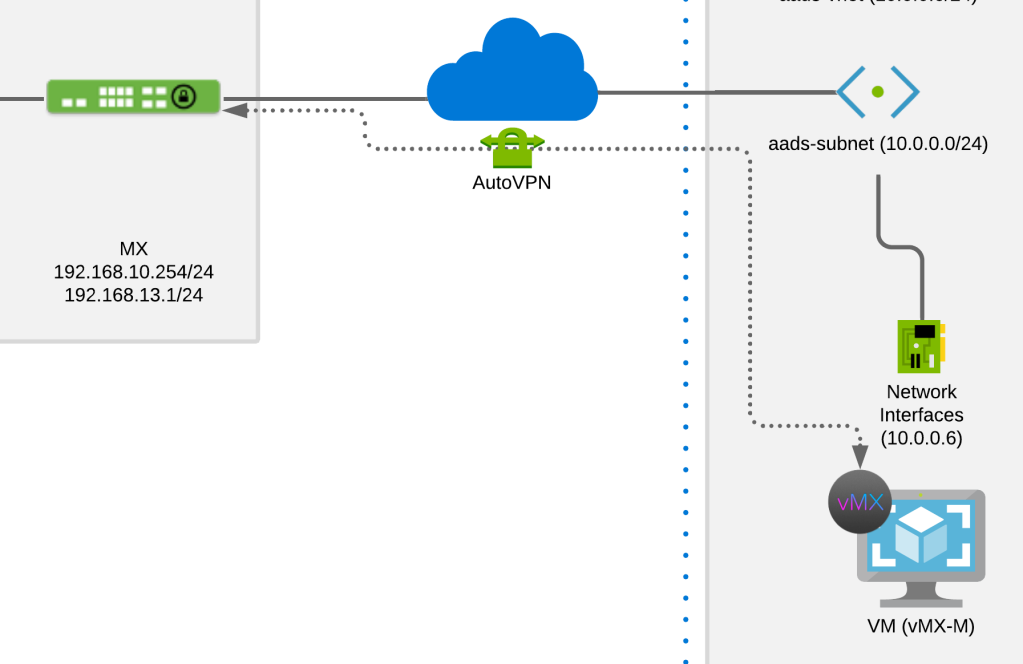
This solution uses vMX and AutoVPN to provide a secure connection between MX and Azure, so that the MR can reach Azure AD DS’s private IPs, 10.0.0.4 and 10.0.0.5. Other solution such as Azure ExpressRoute can also substitute.
vMX
VMX requires an authentication token to deploy. To obtain an authentication token for vMX, start by creating a vMX network in the Meraki Dashboard and navigate to Security & SD-WAN > Appliance status. At the bottom of this page, find the button Generate authentication token… and copy the value.
To deploy a vMX in Azure, type in meraki vmx in the search bar at the top, and this will take you to the vMX page in marketplace. Click on the Create button and go through the wizard to complete the deployment.
DO NOT CREATE A NEW VNET WITH THE CONFIGURATION WIZARD. This blog post uses the same VNet and subnet as Azure AD DS, aads-vnet, and aads-subnet, but in a production environment, vMX and Azure AD DS will use different VNets. If you plan to create a new VNet for vMX, make the VNet independently before going through the vMX configuration wizard. Creating a new VNet using this wizard will place the VNet in the managed application, and it will not allow any user to change the configuration. In detail, the user cannot even configure VNet peering.

See below configuration as reference.
- Basics
- Subscription: MSDN Platforms
- Resource group: Create new -> meraki-vmx
- Region: Australia East
- VM Name: vmx
- Meraki Authentication Token: [Pasted value copied from previous step]
- zone: 1
- Application Name: vmxapp
- Managed Resource Group: [Used prepopulated value]
- Deployment Details
- Virtual Network: aadds-vnet (DO NOT CREATE NEW)
- Subnet: aadds-subnet (10.0.0.0/24)
- VM size: 1x Standard F4s v2
After a while, the status of the vMX in the Meraki Dashboard will turn green. In addition, VNet will assign an IP address to vMX, and in this case, vMX has an IP address of 10.0.0.6. At this stage, the vMX can ping the Azure AD DS IP addresses, 10.0.0.4 and 10.0.0.5. You can confirm this from the Meraki Dashboard using the ping tool of vMX.

Auto VPN
Next, we will connect the MX and vMX with AutoVPN. Currently, the MX has two subnets. One for management with a subnet of 192.168.13.0/24, and the other for wireless clients with a subnet of 192.168.10.0/24. Only the management subnet needs reachability to Azure, so that subnet will only participate in AutoVPN. Navigate to Security & SD-WAN > Site-to-site VPN and change VPN mode to Enabled on the relevant subnet.

Let’s now jump to vMX. For vMX, you will need to insert the subnets in Azure manually because it runs in VPN concentrator mode. In this example, I will configure the subnet of aads-vnet, 10.0.0.0/24. Usually, customers will have a super subnet such as 10.0.0.0/8 assigned to Azure which they will configure instead of 10.0.0.0/24.

At this stage, the MR can now ping vMX, 10.0.0.6.

However, the MR cannot ping Azure AD DS, 10.0.0.4 and 10.0.0.5, which the next section will solve.
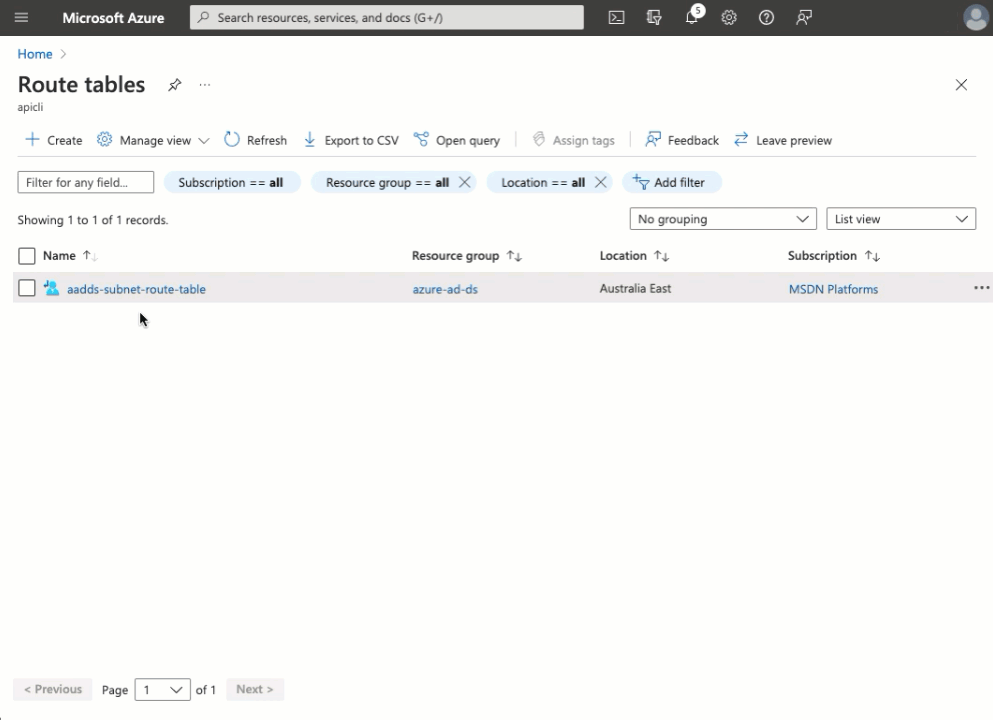
VNet Route Table
For the MR to successfully ping Azure AD DS, we need to change the routing table for adds-subnet. Currently, adds-subnet uses the default routing table, and thus, the subnet transfers the return traffic to the internet. Therefore, we will configure a custom route table for adds-subnet with the relevant routes for the return traffic. Search for “route table” in Azure, and go to the Route table page. Create a custom route table as follows.

- Basic
- Subscription: MSDN Platforms
- Resource group: azure-ad-ds
- Region: Australia East
- Name: aadds-subnet-route-table
- Propagate gateway routes: Yes
Next, add two routes to aadds-subnet-route-table, default gateway destined to the internet and the management subnets for the branch offices destined to vMX’s IP address 10.0.0.6. In this example, the MX has a management subnet 192.168.13.0/24 but I will add the class C private IP address range to point to 10.0.0.6.
- Route name: DefaultGateway
- Address prefix: 0.0.0.0/0
- Next hop type: Internet
- Route name: ClassCPrivateIP
- Address prefix: 192.168.0.0/16
- Next hope type: 10.0.0.6
Finally, associate aadds-subnet-route-table to adds-subnet by clicking on Subnets, and then Associate. Select the VNet and Subnet you have configured.

- Virtual network: aadds-vnet
- Subnet: aadds-subnet
Once associated, the MR can now reach IP addresses of Azure AD DS, 10.0.0.4 and 10.0.0.5. Test this by using the ping tool on the MR.

This ends stitching up the physical sites and Azure. You can test if LDAP works properly with ldp on a Windows machine. To install ldp, Open Apps and Features and click on Optional features. Then, click on Add a feature, and search for RSAT: Active Directory Domain Services and Lightweight Directory Services Tools.
After installation, search ldp.exe. Once AD DS/LDS LDAP Browsing Utility opens, click on Connection > Connect…, and enter the server and port information.
- Server: azure-adds.apicli.com
- Port: 389
Next, click on Connection > Bind, and enter the admin details by selecting Bind with credentials for the bind type.
- User: [email protected]
- Password: [Password]
- Bind Type: Bind with credentials
After binding, click on View > Tree, and expand the tree from the left pane. Click on the one starting with OU=AADDC Users. This organization unit (OU) holds all of the users in Azure AD, and created users, Azure AD Admin and Test, exist. Take a note of this DN as the MR SSID configuration will use this.
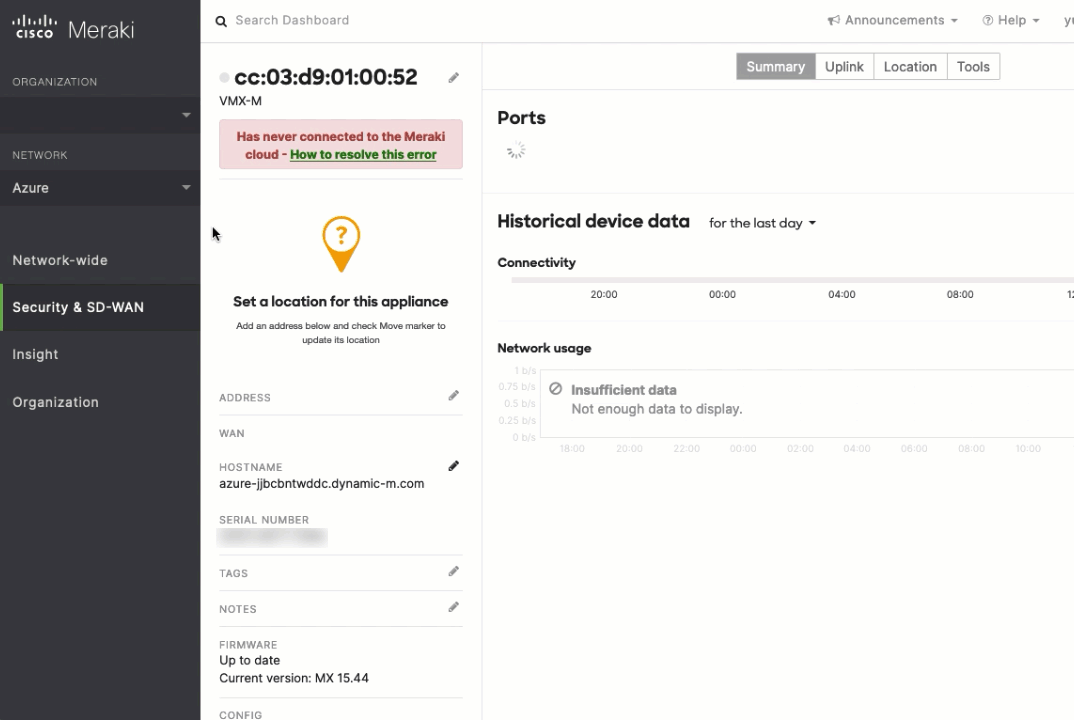
Meraki MR
Go to Wireless > SSIDs on the Meraki Dashboard, and create an SSID. The below screenshot shows an SSID with the name azure-ad-test created and enabled.

Now, go into the SSID settings by clicking on edit settings. Select Enterprise with Local Auth for Association requirements. After selecting Local Auth, the SSID page will show LDAP configuration, so scroll down a bit.
For Password Auth under Authentication Configuration, select Allow password authentication. Add the LDAP server, LDAP admin, and LDAP server base DN. Also, upload the .PEM certificate generated when configuring Azure AD DS.
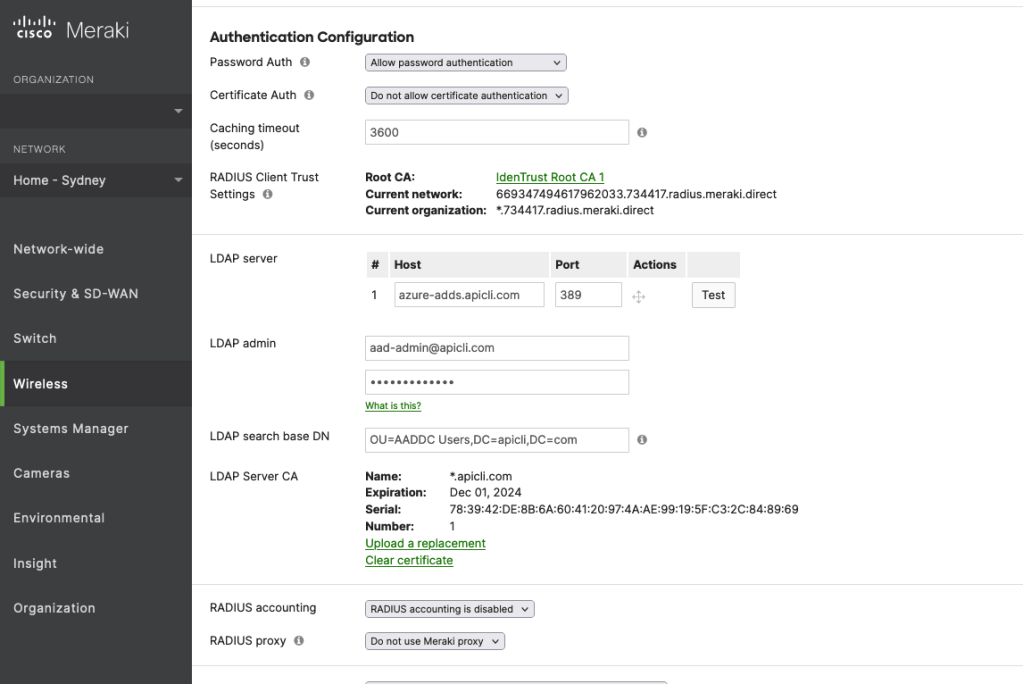
- Authentication Configuration
- Password Auth: Allow password authentication
- LDAP server
- Host: azure-adds.apicli.com
- Port: 389
- LDAP admin
- [email protected]
- [Password]
- LDAP search base DN: OU=AADDC Users,DC=apicli,DC=com
- LDAP Server CA: [Upload .PEM certificate]
After saving the configuration, test authentication with the test user. When testing from the Meraki dashboard, remove the domain from the username.

Verify
On a wireless device, connect to the SSID created and use the credentials of Test. Apple’s screen recording sensors out passwords, so it looks as if I have used a blank password. In reality, I did type in the password.


Can we able to authorise using MAC bindings to wireless users?
LikeLike