Meraki introduced a new licensing schema for MRs, and now an advanced license exists along with the enterprise license. The advanced license provides native Cisco Umbrella integration to provide Domain Name System (DNS) security with the Meraki Dashboard and provides all of the features supported in the enterprise license. Also, the Security Center page in the Meraki Dashboard will provide insight into DNS security events. In this article, I will walk through the advantages of the advanced license, configure the solution, look at the MR intercepting all DNS queries with packet captures, and consider some limitations.
Advantages
Meraki users may think that the features of the Cisco Umbrella in the advanced license overlaps with the content filtering feature powered by BrightCloud in the enterprise license, but Cisco Umbrella has an advantage from a security perspective. Security relies on data, and the value of data comes from volume, variety, and velocity. The database needs information about all types of attacks and not just an attack for a certain device. Attacks differ from a router and a client. In addition, the database needs data every day and not just data from a certain time. Cisco TALOS covers a vast range of products such as email, networks, cloud, web, endpoints, and everything in between and they all produce telemetry to create an unbiased database.
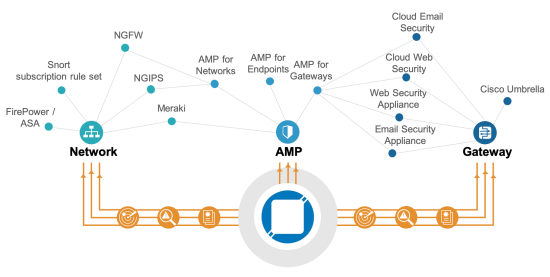
Whether people like it or not, Cisco having a high global market share and a full security portfolio plays in favor of creating this database. TALOS feeds the created intelligence from the gathered data to Umbrella, so users can protect their network from a variety of attacks.
Requirements
Requirements do exist to use the native Umbrella integration with the MR such as the following.
- Any MR running 26.X+ firmware
- MR advanced license or upgrade license
- Per device licensing and not co-termination
Also, all of the MRs in a single network need an advanced license to use the Umbrella feature. If the network consists of 10 MRs, then the user will need 10 MR advanced license.
Configuration
Once the network contains MRs with advanced licenses, then the user can turn on Umbrella from Wireless > Firewall & traffic shaping > Block applications and content categories and clicking on Enable Umbrella protection. He or she can choose from seven predefined policies, and that’s it!
To confirm the configuration, access welcome.opendns.com to test it. If the MR successfully reloves a domain via Umbrella, the image on the left will appear.
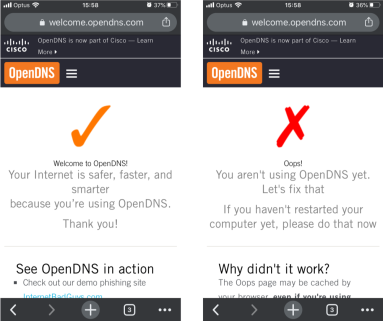
The image on the right will appear if the SSID has Umbrella disabled or the Dashboard has not yet provisioned the configuration, so check the configuration or the status of the access point if this happens from Wireless > Access points > [ select access point ] > FIRMWARE.
Next, choose one of the predefined policies with the security filtering for Umbrella on the Meraki Dashboard. In detail, the security filter will block traffic related to malware, command control callbacks, phishing attacks, and crypto mining. Access http://internetbadguys.com, HTTP explicitly, on your web browser and the browser will redirect to the Cisco Umbrella page indicating that the service has blocked the site due to a phishing threat. Now access https://internetbadguys.com, HTTPS explicitly. The browser should show a warning page indicating a certificate issue.

This happens because Umbrella tries to redirect the connection to the phishing site and the certificate used within that process does not match with the domain, internetbadguys.com. Therefore, the client should have the Umbrella root certificate installed to avoid this page. Users can manually install the certificate from the browser to the machine, but a mobile device manager, such as Meraki Systems Manager, can push the certificate to all corporate devices at once.
Cisco provides the Umbrella’s root certificate in its PKI index as “Cisco Umbrella Root CA”. After downloading the certificate, create a profile from Systems Manager > Settings > Add a profile, and select Device profile (default) if using Meraki’s mobile device management. Upload the certificate from Add settings > Certificate, and select the devices to push in the Profile configuration.
Lastly, the Security Center on the dashboard, Organization > Security center, shows all DNS events detected by the MRs. It shows that Umbrella has successfully blocked access to http://www.internetbadguys.com.

As of April 3rd, 2020, the dashboard has a bug in which the network column shows an ID and not the network name seen in the screenshot above.
Under the Hood
The Meraki MR intercepts all DNS requests regardless of the DNS server configuration on the client and enforces everyone to resolve a domain through the Umbrella servers. Even if the user changes the DNS server IP addresses on the device, the MR intercepts those DNS requests and sends them to the Umbrella servers. Let’s see this enforcement with packet captures taken on the iPhone itself and the switch port with the MR.

In this scenario, an iPhone with an IP address of 192.168.10.103 will send a DNS request to 172.16.100.1 to resolve meraki.cisco.com. Then, the MR will intercept that DNS request and sends the DNS request with its own management IP address, 192.168.10.141, to Umbrella, 202.67.220.220. Once Umbrella resolves the domain and the MR receives the response, the MR sends the DNS response back to the iPhone with a source IP address of 172.16.100.1 as if nothing has happened.
Since Umbrella encrypts all DNS requests, another client with an IP address of 192.168.9.101 will send continuous ping packets to the iPhone to track the DNS request to resolve meraki.cisco.com in the 2 packets captures. The packet capture on this iPhone will indicate when the iPhone made a DNS request in terms of ICMP request number. Filtering the packet capture, the iPhone made a DNS request between sequence number 3303 and 3304, and it sent a DNS request to 172.16.100.1.

Moving to the packet capture on the switch, the two ICMP requests with sequence number 3303 and 3304 exist. Moreover, the MR does not send any packets to 172.16.100.1 and sends packets to 208.67.220.220.

After the iPhone receives the DNS query response, it starts a three-way handshake with meraki.cisco.com which resolved to 104.20.41.242 in the switch packet capture which also confirms that those packets sent to 208.67.220.220 resolved meraki.cisco.com.

Limitations
The advanced MR license only covers wireless clients and not wired clients. Of course, the DNS requests have to go through the MR for it to intercept them. Therefore, the user needs a manual Umbrella integration with the Meraki Dashboard using API keys to protect both wireless and wired. Additionally, devices need to install the Umbrella agent if they need protection outside of the corporate network.
